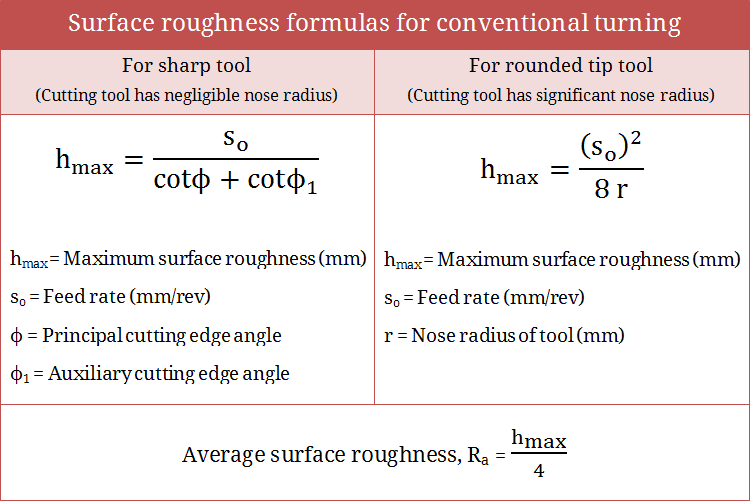
Scallop marks or feed marks are inherently produced on finished surfaces machined by various conventional machining processes due to presence of feed rate and depth of cut. Such feed marks actually indicate unmachined material still present on the machined surface, which lead to irregularities or roughness of the surface. Although roughness of the machined surface can be measured directly using suitable instruments, its estimation is also crucial for various analysis purposes. Even though are many parameters that can affect surface finish, only few dominating factors are considered for mathematical analysis.
It is worth noting that surface finish cannot be determined quantitatively; instead it can be expressed qualitatively. However, surface roughness can be quantified and usually this value is used to indicate quality or level of surface finish. For example, surface roughness of a milled surface is 2µm (value to quantify) or the surface finish of the milled surface is very good (attribute to qualify). Similarly in conventional tool based machining, surface roughness can be mathematically expressed with the help of cutting parameters and tool geometry and the same can be utilized for determination of surface roughness value.
- Difference between surface roughness and surface finish.
- Difference between surface roughness and surface integrity.
Surface roughness formulas for turning
Surface roughness formulas for straight turning using a single point cutting tool are given below. Two possible cases may occur here—the tool has rounded tip or the tool is sharp. Making perfectly sharp tool is not feasible (in fact, sharpness cannot be quantified; it is indicated by edge roundness value). Every tool has certain nose radius. When this nose radius is comparable to depth of cut, the tool is considered as rounded tip tool. Alternatively, when tool has negligible nose radius as compared to depth of cut, it can be safely presumed as a sharp tool.
- Derive formula for surface roughness in turning with a rounded tool.
- Derive formula for surface roughness in turning with a sharp tool.
- Which tool produces smoother surface – rounded tool or sharp tool?

All of the above formulas give an estimation of surface roughness value in machining. Actual roughness of a machined surface can vary from this estimated value as there are many other controllable and uncontrollable factors that influence level of surface finish. However, estimated values are reasonably sufficient for most of the analytical purposes.
References
- Book: Advances in Manufacturing Technology XV by D. T. Pham, S. S. Dimov and T. O’Hagan (Professional Engineering Publishing Limited).
- Proceedings: K. S. Umashankar, B. J. Manujesh and N. A. Jnanesh; Recurrence Qualification Analysis – A Tool to Analyze the Surface Finish During Machining; Advances in Mechanical Engineering; 2010.
- Book: Machining and Machine Tools by A. B. Chattopadhyay (Wiley).
- Book: Metal Cutting: Theory And Practice by A. Bhattacharya (New Central Book Agency).