Abrasive Jet Machining (AJM) - A Detail Overview
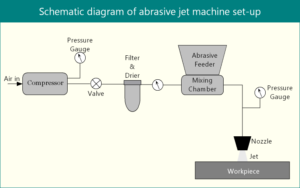
Abrasive jet machining (AJM) utilizes a high velocity jet of abrasives to remove material from work surface by impact erosion. Get an overview of AJM process, mechanism, parameters, equipment, MRR, accuracy, capability, pros and cons, applications, etc. Read details...
Advantages and Disadvantages of AJM
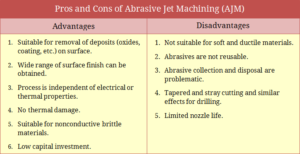
Good surface finish, independent of electrical properties, no thermal damage, suitable for nonconductive brittle materials, low capital investment, etc. But limited nozzle life, not suitable for ductile materials, abrasives are not reusable. Read details...
Analytical Formula for MRR in AJM (Modeling)
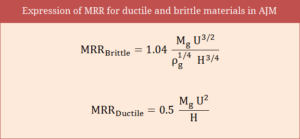
Modeling for material removal rate (MRR) in abrasive jet machining for ductile and brittle materials is presented here. Necessary assumptions are also enlisted. Read details...
Advantages and Disadvantages of Welding Joint
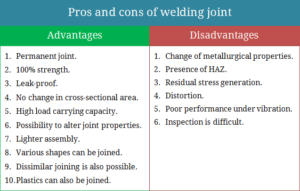
Pros of welded joints: permanent joint, superior strength, leak-proof, no drilling, high load carrying capacity, possibility to alter properties, lighter assemblies, dissimilar metal joining. Cons: distortion, HAZ, residual stress, poor vibration sustaining capability. Read details...
Polarity in Welding – Straight, Reverse & Alternating
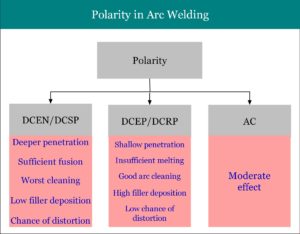
Three different polarities used in arc welding are Direct Current Straight Polarity (DCSP), Direct Current Reverse Polarity (DCRP) and Alternating Current (AC). Their advantages and disadvantages, effects on performance and selection of polarity are also discussed. Read details...
Difference Between Straight Polarity & Reverse Polarity

Difference between straight polarity and reverse polarity in arc welding on various aspects such as connection, performance, penetration, deposition rate, defects, etc. Comparison among straight polarity and reverse polarity are provided in tabulated form. Read details...
Definition of Machining or Metal Cutting
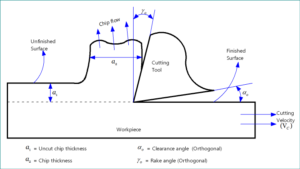
Machining is one manufacturing process by which excess material is removed by shearing from a pre-formed blank in the form of chips using a wedge shaped cutting tool in order to get desired shape, finish and tolerance. Read details...
Tool Signature – ASA System, ORS System, NRS System
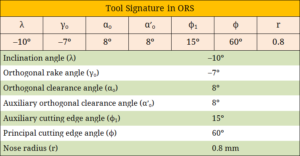
Various systems for specifying tool signatures are American Standards Association (ASA) system, Orthogonal Rake System (ORS) and Normal Rake System (NRS). Tool signatures in all three systems and corresponding examples are provided here. Read details...
Single Point, Double Point & Multi-Point Cutting Tool
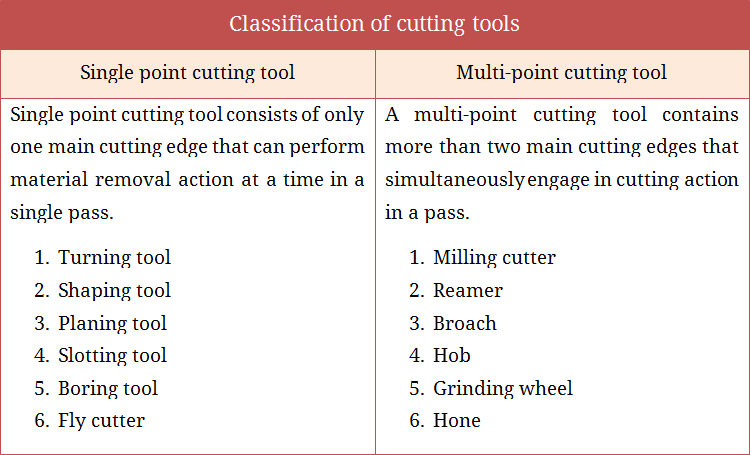
Single point, double point and multi-point cutting tool, their examples, pros and cons are discussed here. When cutter has only one main cutting edge, it is called single point cutter; when it has two then it is called double point cutter; and when it have more than two it is called multi-point cutter. Read details...
What is Single Point Turning Tool (SPTT)?
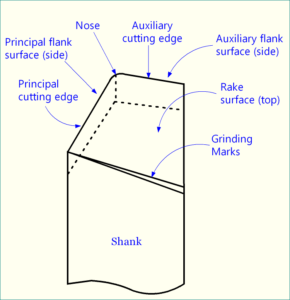
Full form of SPTT is Single Point Turning Tool. It is the cutting tool used in lathe operations (turning, facing, threading, grooving, etc.) in machining. Significance of Single Point is also discussed here. An SPTT consists of three main surfaces namely rake surface, principal flank surface & auxiliary flank surface. Read details...
Surface Roughness, Surface Finish & Surface Integrity
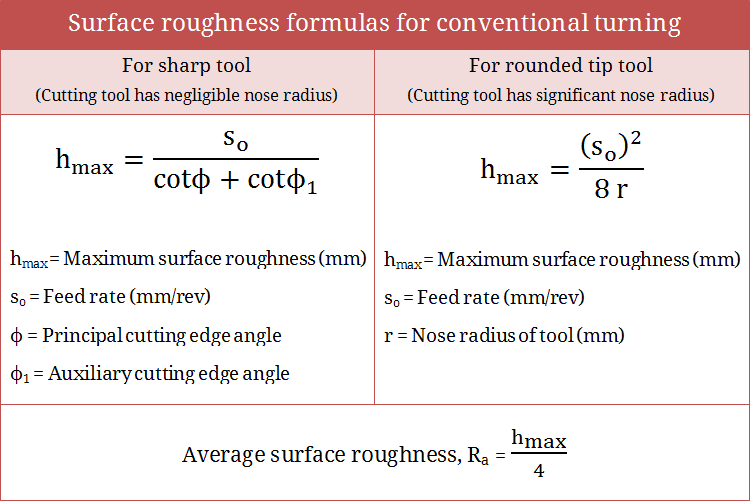
Concepts of surface roughness, surface finish and surface integrity in machining are discussed here. Roughness refers to localized deviation of a surface from its nominal level; finish indicates quality of a surface with the help of various attributes; and integrity covers overall surface condition of the workpiece. Read details...